IN BOOK PLATES

Plate 1
The Super Étendard was an elegant naval strike jet. A white AM39 Exocet is under the right wing. (Heritage Images (Luis Rosendo) Alamy Stock Photo)

Plate 2
A wonderful photograph of HMS Hermes (R12) ploughing through rough South Atlantic swells. Her ski-jump ramp for launching Harriers and the ‘single bedstead’, rectangular Type-965M radar atop the foremast are clear. Very difficult to see, but HMS Broadsword’s bow can be seen on Hermes’ starboard side. (Martin Cleaver/Alamy Stock Photo)

Plate 3
An Argentine Lockheed C-130H Hercules, TC-64, photographed in 1989, still wearing its Falklands camouflage scheme. (The Aviation Photo Company)

Plate 4
An Argentine Navy A-4Q Skyhawk with three Mk 82 500lb (230kg) bombs. (Heritage Images (Luis Rosendo)/Alamy Stock Photo)

Plate 5
HMS Exeter (Type 42) in 2005. The only obvious addition to Exeter since 1982 is the radar-guided Phalanx Gatling gun next to the funnel (white thimble radome), installed after lessons learned in the Falklands War. As with all early Type 42s, the 4.5-inch gun is close to the bow, with the Sea Dart launcher directly behind (with two Sea Darts loaded). The domed radomes for the Type 909 fire control radars are prominent. The air search radar is mounted on the foremast above Exeter’s superstructure. Most Type 42s (including Argentine) used the Type 965R radar (see Plate 11) but Exeter had the far superior Type 1022. (Richard Naude/Alamy Stock Photo)

Plate 6
Sea Dart. Two red drill rounds are shown on their launcher on the foredeck of the Type 42 destroyer, HMS Edinburgh, in 2012. (Crown copyright/Royal Navy)

Plate 7
Two Sea Harriers in their menacing dark sea grey paint scheme sit on Hermes’ deck. The pilot is sat in the foremost aircraft, fogging up the canopy. A Lynx HAS2 is airborne and a Sea King 5 is on the ship’s stern. (PA Images (Martin Cleaver)/Alamy Stock Photo)
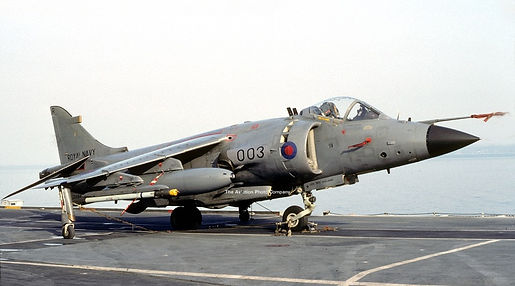
Plate 8
A Sea Harrier FRS1 from 801 NAS (ZE694) in its dark sea grey scheme. This aircraft participated in the war. It has 30mm gun pods under the fuselage. Under the right wing are a drop tank and a launch pylon for AIM-9L missiles. The aircraft carries an AIM-9 acquisition round, used for training (without fins). (The Aviation Photo Company)
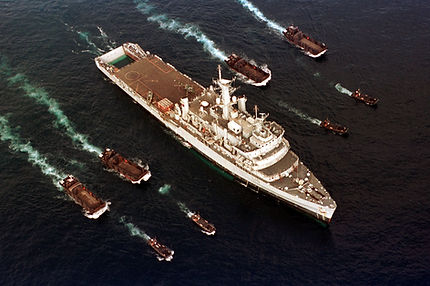
Plate 9
HMS Fearless LPD (landing platform dock) with her four LCUs (landing craft utility) and four LCVPs (landing craft vehicle personnel). Note the obvious white wakes produced by the LCUs, making travel in daylight very dangerous. The photograph was taken in 2001 after Fearless’s Seacat launchers had been removed. (Crown copyright/Royal Navy)

Plate 10
A Harrier GR3 from 1(F) Squadron in the hover. One of the louvred, rotating jet nozzles is clearly visible (down position). The dark window at the front of the thimble nose is for the LRMTS (laser rangefinder and marked target seeker). The aircraft carries two fuel tanks under the wings and two 30mm gun pods under the fuselage. (PA Images (Martin Cleaver)/Alamy Stock Photo)

Plate 11
HMS Sheffield (4 May), viewed from the port side, soon after being hit on the starboard side by an AM39 Exocet. The Type 21 frigate, HMS Arrow, is alongside. Note Sheffield’s ‘double bedstead’ Type 965R radar on the foremast with billowing smoke behind (compare with Hermes’ single bedstead version, Plate 2). (PA NEWS/Alamy Stock Photo)

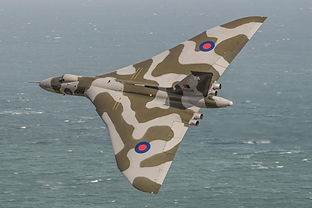
Plate 13
Vulcan B2 bomber (XH558), revealing its massive delta wings and swirling two-tone camouflage. (Paul Hardy/Alamy Stock Photo)

Plate 15
Stanley airport after 1 May attacks, looking east from a helicopter. The runway is at the far left, with the apron, airport terminal and a large hangar to the right. Black arrows with numbers 2–10 show the locations of the corresponding craters from Black Buck 1 (compare with Map 5). (PA images (Chris Bacon)/Alamy Stock Photo)

Plate 17
A Hawker Siddeley Nimrod MR2P photographed in 1993. Note the refuelling probe (front), the very long bomb bay and the long magnetic anomaly detector (MAD) at the rear. (The Aviation Photo Company)

Plate 12
An Argentine twin 35mm Oerlikon cannon close to residential buildings in Stanley. (Mary Evans Picture Library/DAVID KIRBY)

Plate 14
Diagram showing the complex multi-refuelling plan to get a single Vulcan bomber to Stanley Airport. The Victor tankers are labelled Va-Vc. Note that Va3 was supposed to provide the Vulcan with its final combat top-up but due to last-minute problems, it gave its fuel to Vb6, which refuelled the Vulcan. (Created by M.R. Ibbotson)

Plate 16
Three Handley Page Victor K2 air refuelling tankers flying in close formation. The massive wings and highly swept T-tails are evident. (Brian Lawrence/Alamy Stock Photo)

Plate 18
An RAF Vickers VC10. Its graceful main wings are shown to good effect. Note the large flaps and leading-edge slats that gave it good take-off and landing characteristics. The engines are mounted on the rear fuselage under the T-tail. Colorised by MR Ibbotson. (The Aviation Photo Company)
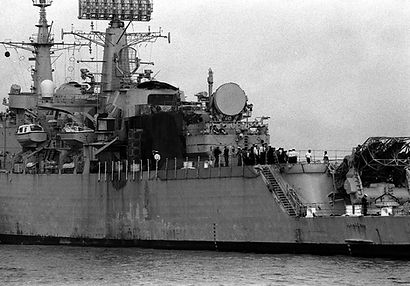
Plate 19
HMS Glamorgan’s hangar side entrance covered by a tarpaulin after being hit by an AM38 Exocet. The Sea Slug launcher is on the stern and the large Type 901 fire control radar (like a spotlight) is on top of the hangar. (PA/Alamy Stock Photo)

Plate 21
The beautiful lines of Dagger C-419, photographed during the war. Note the tricolour camouflage scheme and the pitot tube below the narrow nose radome. This aircraft was piloted by Lieutenant Castillo when it was shot down by a Sea Harrier using an AIM-9L missile on 24 May. Castillo was killed. The Dagger carries the standard load of three 1,300-litre drop tanks. They supplied sufficient fuel to fly to Stanley and back but restricted flight to subsonic speeds. (The photograph is used with kind permission from Major VGM Guillermo Posadas, Argentine Air Force (Avialatina Editorial Collection). The high-resolution image was provided by Vladimiro Cettolo from Aviones en Argentina.

Plate 23
A busy photograph of a Wessex HU5 and a Gazelle AH-1 helicopter flying in close proximity late in the war. Note the rocket pod on the Gazelle. (Soldier Magazine photographer, Haley Paul, Crown copyright. IWM (FKD 320)
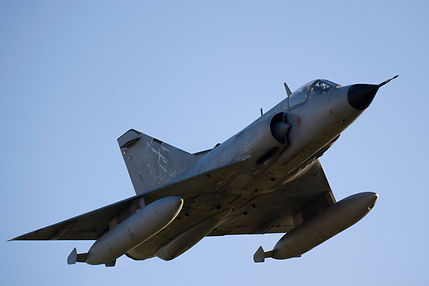
Plate 20
An Argentine Dassault Mirage III fighter in flight, carrying two 1,300-litre drop tanks. It is easily distinguished from the Dagger because its pitot tube exits the centre of the bulbous nose radome (compare with the Dagger in Plate 21). (Buteo/Alamy Stock Photo)

Plate 22
A remarkably opportune photograph taken by engineer Dave Oddy, on 12 May. It was taken from HMS Brilliant as Lieutenant Gavazzi’s A-4 approached HMS Glasgow. The photograph reveals how incredibly low Argentine pilots were on their bomb runs, partially explaining why their bombs didn’t have time to arm. Gavazzi’s bomb passed through Glasgow without detonating but struck the engine at around 400 knots on its way through, disabling it. (Dave Oddy, CC BY 3.0 <https://creativecommons.org/licenses/by/3.0>, via Wikimedia Commons)
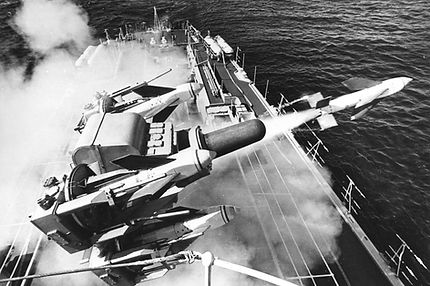
Plate 24
Seacat missile being fired from a quad launch system at a low inclination. The dark-grey thimble-shaped radome on the launcher contains the radio guidance system. Note the smoke from the flares on the rear missile fins. (Chronicle/Alamy Stock Photo)
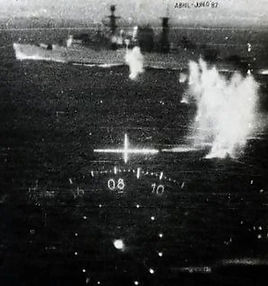
Plate 25
Gun camera footage from Lieutenant Callejo’s Dagger while he fired 30mm rounds at HMS Brilliant on 21 May. He was flying on bearing 085°, while Brilliant headed north. Callejo’s cannon shells create a wall of waterspouts, leading to the ship. (Fuerza Aérea Argentina. Photograph provided by Major VGM Guillermo Posadas)

Plate 26
A Sea Slug launch with boosters still attached: fire and smoke. Colourised. (Chronicle/Alamy Stock Photo)

Plate 27
HMS Ardent’s stern ablaze after being attacked by multiple fast jets. The bombs have destroyed the hangar, which had the Seacat launcher on top. Note the forlorn Type 912 fire control radar dish for the Seacat, just behind the funnel. Despite radar control, Seacat completely failed to defend the ship. Crewmembers are lined up in an orderly fashion to abandon ship. (Crown copyright/Royal Navy)

Plate 28
Perhaps the most remarkable photograph of the war, taken by Lieutenant Bell-Davis on HMS Broadsword as Captain Carballo and Lieutenant Rinke fly towards the ship in their A-4s at 50 feet altitude (25 May). All three men, both planes and the ship survived. At the time of the photograph, the aircraft are less than one second away from the photographer! Note the dark puffs of smoke behind both aircraft, caused by the pilots adjusting throttle settings for their bomb runs. Splashes are defensive fire. One bomb skipped off the ocean and passed through the helipad, damaging a Lynx helicopter. (Crown copyright, IWM (FKD 1256)