
VULCAN BOMBER

Plate 1
Vulcan XM 594 at Newark Air Museum, Nottinghamshire. Steve Atwell gave me a guided tour inside the cockpit in 2025. The refuelling probe sticks out from slightly above the nose. Directly on the nose’s tip is the NBS radome. It contains the Texas Instruments AN/APN-170 Terrain Following Radar (TFR - ARI 5959). This allowed the bomber to fly below 90 metres at speeds of 400-650 km/h. Photographed by MR Ibbotson.

Plate 2
An impressive photograph of a Vulcan B2 Bomber soon after take-off, revealing its massive delta wings. JONATHAN AYRES / Alamy Stock Photo.

Plate 3
Vulcan XL318 at the RAF Museum in Hendon. This photograph shows the twenty-one 1000lb bombs that the aircraft could carry, as was the case on the Black Buck missions during the the Falklands war. Also visible is the bomb aimers viewing window. Photographed by MR Ibbotson, Hendon RAF Museum, 2025.

Plate 4
One of the three 7-bomb racks carried in a Vulcan’s bomb bay. Rob Lavers Photography / Alamy Stock Photo.

Plate 5
Vulcan instrument panel (XM 594), with the cushions of both ejector seats in-shot. The image reveals both control columns, the central throttles and the many dials. Photographed by MR Ibbotson, Newark Air Museum, 2025.

Plate 6
View through the front windows of XM 594. Note the slightly blue protective shields to the rear of the external windows. Photographed by MR Ibbotson at Newark Air Museum, 2025.

Plate 7
In a Vulcan, the bombing computer provided a heading to the pilot via the central dial in this image. Working in coordination with the computer, the pilot was required to keep the yellow and black pointer exactly vertical. This was not easy. Photographed by MR Ibbotson, Newark Air Museum, 2025.

Plate 9
View of the rear-facing workstations for the radar navigator, plotter and air electronics
operator in a Vulcan. Each man had a swivelling chair. The seat cushion was expandable, to allow the crew to stand under high G-forces in an emergency (prior to jumping out of the hatch). The photograph was taken from the side of the entry/exit hatch. Photographed by MR Ibbotson, Newark Air Museum, 2025.

Plate 8
Below the cockpit is a bomb aimers window. Above the window is a fold-down table with a handle (table in up position). During the Falklands war, this was folded down and the Inertial Navigation System (INS) was mounted on it. The two air conditioners are to keep visitors cool (not present in operational aircraft). Photographed by MR Ibbotson, Newark Air Museum, 2025.

Plate 10
Closer view of the rear-facing workstations. The radar screen is clearly visible to the left. Photographed by MR Ibbotson, Newark Air Museum, 2025.

Plate 11
View of the entry/exit hatch for the Vulcan’s crew. In an emergency, the radar navigator, plotter and air electronics operator would have to jump out of this hatch with parachutes. Photographed by MR Ibbotson, Newark Air Museum, 2025.

Plate 12
A giant bomb crater created by a 1000lb bomb dropped from a Vulcan bomber on Stanley airport on 1 May 1982. The crater is very close to the rear of the airport terminal (see Map 5). The nearby Pucará aircraft provides scale. Photographed by Eduardo Rotondo, an Argentine war correspondent with BAI Press.

Plate 13
Members of the British Army’s Gurkha regiment (and one from the Parachute Regiment) stand in one of the Vulcan bomb craters at Stanley airport. The amount of debris displaced when a 1000 lb bomb is dropped from high altitude with a delay fuze is prodigious. Faces have been blanked to remove identities. Mary Evans Picture Library/DAVID KIRBY.

Plate 14
Argentine soldiers stand in a Vulcan bomb crater with Stanley airport terminal behind. Faces have been blanked to remove identities. Photographed by Derek Pettersson (a Falkland Islander). Derek's website is worth a visit:

Plate 15
Bomb crater after the war (Stanley airstrip). The craters were repaired but formed into pot-holes due to the terrible weather and ongoing aircraft landings. The soft, underlying sand is clear. Photograph attributed to Martin Cleaver.

Plate 17
Vulcan XM597 at Ascension in 1982, armed with AGM-45 Shrike. Crown Copyright.

Plate 19
Vulcan XM607 flying over the Atalntic Ocean. It carries a Westinghouse AN/ALQ-101D electronic countermeasures (ECM) pod on its right wing. Photographed from a Victor tanker by Norman Curtis-Christie. Crown copyright.
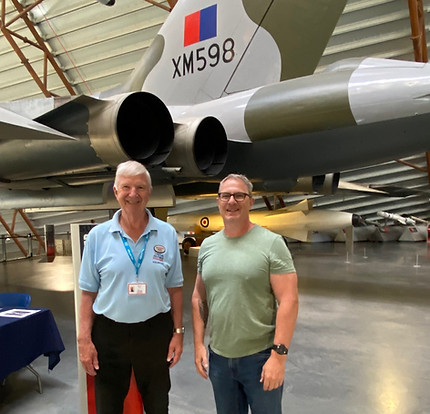
Plate 16
Squadron Leader Martin Pitt (left) with the author in front of Vulcan XM598. He tested Shrike missiles using this aircraft in preparation for their use in the Falklands War. Photographed by Simon Newman at Cosford RAF Museum, 2025.

Plate 18
Vulcan XM607. This aircraft conducted the successful bombing on 1 May 1982. Royal Air Force official photographer Sergeant Brian Lawrence. Crown Copyright.

Plate 20
Vulcan XM597 on the 3 June mission where it needed to divert to Brazil due to a faulty refuelling probe. It is shown on the ground in Galeão International Airport, Brazil. It landed with an armed AGM-45 Shrike, which would not release when in flight. The aircraft was perilously low on fuel when it landed. Image taken by local press.