
BRITISH AIRCRAFT

Plate 1. Short Belfast C.1
Heavy lift transport used to carry large items from UK to Ascension during the Falklands War. Photographer MR Ibbotson, Cosford RAF Museum, 2025.

Plate 2. Short Belfast C.1
The giant turboprop engines on the left wing of a Belfast C.1. Photographed by MR Ibbotson, Cosford RAF Museum, 2025.

Plate 3. Phantom FGR2
After the war, the RAF flew Phantoms into Stanley airport for air defence. One crashed on the Falklands in 1983, along with a Harrier GR3. MR Ibbotson, Hendon RAF Museum, 2025.

Plate 5. Sea Harrier FRS1
Sea Harrier at FOB San Carlos, armed with two AIM-9L Sidewinders. Crown Copyright, IWM FKD 2300.
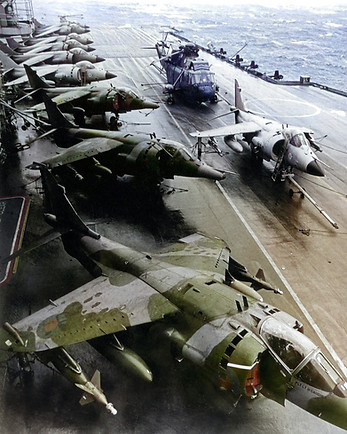
Plate 7. Hermes' deck 19 May 1982
Three Harrier GR3 aircraft of RAF 1 Squadron parked alongside seven RN Sea Harriers and a Sea King helicopter. The light grey paint schemes of the Sea Harriers reveal that these examples arrived on MV Atlantic Conveyor. The nearest GR3 carries two 1000 lb laser guided bombs on its wing pylons. Colorised by MR and AM Ibbotson. Wikimedia Commons: Air Historical Branch-RAF/MOD, Open Government Licence version 1.0.

Plate 9. Harrier engine
The mighty Pegasus engine that powered the Harrier GR3 and Sea Harrier FRS1 during the Falklands War. Photographed by MR Ibbotson, Fleet Air Arm Museum, RNAS Yeovilton, 2025.

Plate 11. Hercules and Victor
British Hercules C.1 aircraft flew very long supply flights from Ascension to the fleet around the Falklands and back. One on 16 May was ~24 hours in duration and covered 6,300nm or 11,668km. Three Victors refuelled the aircraft using a shallow dive, as shown. Hercules flew the longest duration flights but the Nimrods flew faster and further in a shorter time (13,604km in ~19h). Crown copyright.

Plate 13. Victor K2
One of the best photographs from the war depicts a Victor K2 (possibly flown by Squadron Leader Bob Tuxford) flying at low level with its fuel drogues deployed. Photograph was taken from Ascension Island by RAF photographer Sergeant Brian Lawrence.

Plate 15. RAF VC10
Post-war photograph in the new camouflage scheme. The aircraft had by this time been converted into refuelling tankers to start replacing the Victor K2s. A magnificent looking aircraft. Alamy Stock Photo G6DYMR.

Plate 17. Chinook
Chinook BN, the only operational Chinook during the war. Wikimedia Commons: Share Alike 4.0 International License.

Plate 19. Wessex HU5
Wessex from 848 Naval Air Squadron landing very carefully on the small, rear landing pad of SS Atlantic Conveyor. Photograph was likely taken by Gordon Brooks.

Plate 21. Lynx HAS.2
Lynx HAS2 behind a Type-42 destroyer. Crown copyright.

Plate 23. Gazzelle AH.1
Attack helicopter used during the Falklands War. Photographed by Martin Davenport at the Royal International Air Tattoo (RIAT) in 2018.

Plate 25. Humphrey
Humphrey has markings painted on her side indicating her extensive war activities. At the top is a submarine marking. She damaged the ARA Sante Fe with depth charges. Photographed by MR Ibbotson, Fleet Air Arm Museum, RNAS Yeovilton, 2025.

Plate 4. San Carlos Forward Operating Base (FOB).
Photographed by Alistair Campbell, Royal Marines official photographer.

Plate 6. Harrier GR3 (XZ289/07)
Damaged Harrier after crash landing due to ingesting debris at FOB San Carlos (8 June 1982). Pilot: Wing Commander Peter Squire. Ground crews have written ‘SOD OFF ARGIES’ in the grass. Image is attributed to the Ministry of Defence.
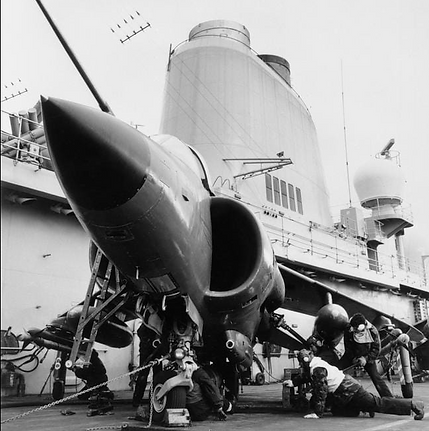
Plate 8. Loading a Sea Harrier with a bomb
Armourers loading a 1000lb bomb on to the Center Line Pylon of a Sea Harrier FRS.1 on board HMS INVINCIBLE off the Falklands (as reported by IWM).
Starting on 12 May Sea Harriers started harassment operations against Stanley airport. Sea Harriers were armed with VT-fused 1,000 lb bombs for release en route to their CAP station. Bombs were released from medium altitude (15,000-20,000 ft). Thanks to Andy Smith for this information.

Plate 10. Harrier GR3 cockpit
The instrument panel in a Harrier GR3. To the left of the obvious yellow chevrons are the switches that allow gun pod activation. On 21 May 1982, Lieutenant Leeming had to rapidly flick the switches up to activate his guns when his missile system failed to activate during a dogfight. Photographed by MR Ibbotson, Farnborough Air Sciences Museum, 2025.

Plate 12. Victor K2
Photograph of a Victor K2 at Duxford, taken in 2015 on a very wet day. The mixture of the dihedral T-tail and anhedral main wings is shown to good effect. Photograph by MR Ibbotson.
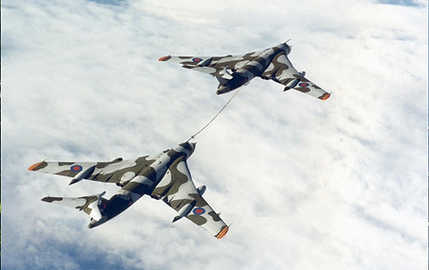
Plate 14. Victors
The Victor is a very photogenic aircraft. In this case, a Victor K2 is transferring fuel to another Victor K2 during a Black Buck mission. This magnificent photograph was taken during the Falklands War by Sgt Brian Lawrence, an RAF photographer.

Plate 16
Busy day at Wideawake Airfield on Ascension Island during the Falklands War. Two Harrier GR3s are in the foreground, armed with AIM-9s for base defence. Three Nimrods are lined up behind them. Thirteen Victor K2s are furthest from the photographer. IWM collection (FKD 1170), credited to the Fleet Photographic Unit.

Plate 18. Sea King with Searchwater radar in dome
Britain had a desperate need for AEW during the Falklands War. AEW helicopters were produced in record time, but too late for combat. Westland Sea King XV704 during radar deployment testing, May 1982. Credit: Leonardo S.p.A. / Historical Corporate Archive (Used under Fair Use for educational purposes).

Plate 20. Lynx HAS.2
Lynx HAS.2 (XZ252) coded 341 and known as 'Purdy', flown by 815 NAS. It is equipped with the Hampton Mayfair electronics warfare system attached to its port side. This provided tuned jamming to disrupt Exocet missile guidance systems. Fleet Air Arm archives.

Plate 22. Scout AH.1
Scout from 3 Commando Brigade Air Squadron. It is fitted with side-brackets, pylons and SS.11 guided anti-tank missiles. Wikimedia Commons: Share Alike 4.0 International License.

Plate 24. Wessex HAS.3
Famous Wessex named Humphrey from HMS Antrim. Photographed by MR Ibbotson, Fleet Air Arm Museum, RNAS Yeovilton, 2025.

Plate 26. Humphrey
Humphrey was damaged by shrapnel while in San Carlos Water. The damage is still visible and highlighted by red circles on the blue exterior. Photographed by MR Ibbotson, Fleet Air Arm Museum, RNAS Yeovilton, 2025.